
How to Draw One-Point Perspective in Narrow Alleys Without a Ruler
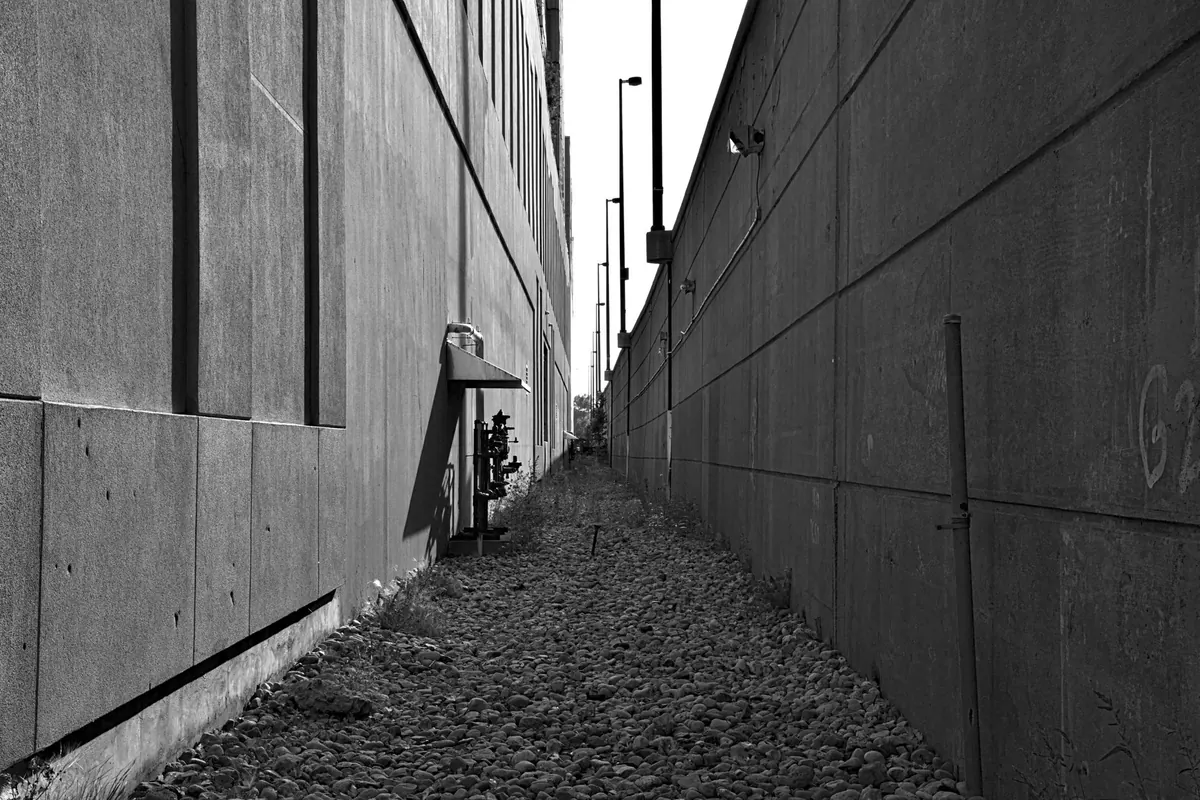
Narrow alleys are unforgiving in the best way. There is nowhere to hide a wrong line. Every eave, sill, and kerb marches toward the same distant point, and if one of them misses it, the whole drawing wobbles like a table with a short leg. But that repetition is also a gift: you get more parallel lines to check yourself against than on any wide boulevard or open square.
And you do not need a ruler for any of it. What you need is a level head, a pencil held at arm's length, and the willingness to draw four or five lines so faint that nobody but you will ever notice them.
Your Eye Level Already Sets the Horizon
Here is the part that saves the most time. When you look down an alley without tipping your head, the horizon sits at exactly your eye height. You do not have to calculate it or hunt for it with a stretched string. Find something in the scene that is level with your eyes — a door handle, the crossbar of a shuttered window, the top of a low wall, a painted number on a bin — and that is where your perspective horizon runs.
On the page, it becomes one faint horizontal line. Judge its position by comparing it with the far opening of the alley: if your eye level sits, say, two-thirds of the way up that distant rectangle, place the horizon two-thirds of the way up the rectangle you have drawn for it. Then commit to it and keep your head still while you sketch. Tilt your chin up to study the roofline and the horizon quietly shifts, which is how sketches end up with eaves and pavement lines that refuse to meet. Glance up with your eyes, not your neck.
Finding the Vanishing Point by Eye
Use three lines, not two
Pick three lines in the scene that are genuinely parallel in the real world: the eave of the left wall, a course of brick or a row of window sills, the edge of the pavement. Extend two of them across the page with one long sweep from the shoulder. A wrist flick will curve, so move the whole arm. Where the two cross is your vanishing point. Now extend the third line and see whether it lands on the same spot. If it does, you are right. If it misses, you misread one of the first two — almost always the flattest one.
Trust the steep lines first
Lines close to eye level barely converge, so a small misjudgement sends the crossing a long way off. Lines high on the wall or low on the ground converge hard and are much easier to read. Use a steep eave and a steep kerb to find the point, then keep the nearly flat ones as a final check.
When the point falls off the paper
In a narrow alley it usually does. Two fixes work well. First, hold your pencil up so it points at the off-page vanishing point, then slide the pencil down to the paper without changing its angle and draw a light line along it; repeat alongside for the next line and you have a set of parallels by eye. Second, simply turn the sketchbook. Rotating the page by thirty or forty degrees often brings the point onto the sheet, and you can turn it back when the guide lines are in place.
Five Guide Lines That Hold the Sketch Together
Once the vanishing point is found, resist the urge to draw a web of construction lines. Five is enough:
- The horizon, drawn faintly right across the page.
- The left pavement line, from where the wall meets the ground at the near edge, running to the vanishing point.
- The right pavement line, doing the same on the other side.
- The near eave line, from the top of the closer wall toward the point.
- One more parallel line you can actually see — a sill row, a string course, the top of a doorway — as confirmation.
Then add the near vertical corner where the two walls meet closest to you. In one-point perspective every vertical stays vertical, so all your door jambs and window edges run parallel to the sides of the page. Keep the guides light: a 2H pencil or a very dry hand. Squint at the page. If the guides shout louder than the subject, they are too dark.
Draw the Far Opening First
Most people start with the big near wall and work inward, then discover the far end has grown too large and the alley looks like a corridor for giants. Reverse it. Block in the small distant opening first — the pale rectangle where the alley meets the street beyond — and let everything else grow outward toward you. It is much easier to enlarge the near shapes than to shrink the distant one.
For proportions, use the pencil as a measuring stick: arm straight, elbow locked, thumb slid up the shaft to mark a length. Measure the height of the opening, then compare it with the width of the street at your feet. Carry the ratio, not the measurement. One reliable rule of thumb: in a genuinely narrow alley the far opening is far smaller than instinct suggests. If your sketch looks plausible but slightly too roomy, the distant end is usually the culprit.
Doors, Windows, and the Narrow Sky
Every window top and bottom sits on a line running to the vanishing point. Draw those receding lines first, then drop the verticals between them. In a row of four shuttered windows, the near one is widest, each following one is narrower, and the gaps between them shrink faster than you expect. If you space them evenly, the wall will look flat no matter how accurate your vanishing point is.
The sky does the same work. In a tight alley the strip of sky overhead is a long wedge whose sides converge toward the same point, and drawing that wedge honestly does more for the sense of height than any amount of detail on the walls. The pavement behaves the same way: cobbles or flagstones flatten and crowd together as they recede, and the drain channel gives you a free, gently curving line to lead the eye in. Light matters too. One wall catching sun and the other in shadow will sell the depth long before a viewer checks your geometry.
Three Mistakes That Make Alleys Look Wrong
- Tilting verticals. If the door jambs lean, you have drifted into two-point or three-point thinking. Check a few against the edge of the page, and check that your book itself is not sitting crooked on your knee.
- Fanning lines. Guides that spread apart instead of converging mean the vanishing point was found from a curved wrist sweep. Redraw them in one long movement from the shoulder.
- Detailing too early. Brickwork, shutters, and hanging plants are lovely, but they cannot rescue a set of walls that do not converge. Get the five guides right first, then decorate.
A Ten-Minute Alley Drill
Find a plain alley with a clear view to the far end and give yourself ten minutes. Mark the horizon in the first thirty seconds. Spend a minute finding the vanishing point with three parallel lines and checking it. Lay in the five guides. Block the far opening small, then the near vertical corner, then the eave and kerb lines. Add doors and windows only where the guides already tell you they belong. Stop when the timer goes.
Then do the same view twice more, from the same spot. The second pass will be quicker, and by the third the lines will start behaving without much argument. That repetition, not a ruler, is what trains your eye. When the ten minutes are up, walk to the next alley and begin again.
Photo: Ghost Acolyte / Pexels